

Sculpture / Three-Dimensional Design
This course emphasizes three-dimensional design concepts in cardboard and found objects.
Each assignment works through the design process and has two parts:
1. Sketching: Students work through the design process to explore conceptual frameworks and ideas and develop actionable plans.
2. Construction Phase: executing the plan. The concept of “maquettes” or “sculptural prototypes” will be explored (as needed), to address engineering issues. The focus of each assignment will be aesthetic rather than technical.
Evaluation is based upon group critiques, application of technical skill, execution, and most importantly how much thought and planning went into a specific work.
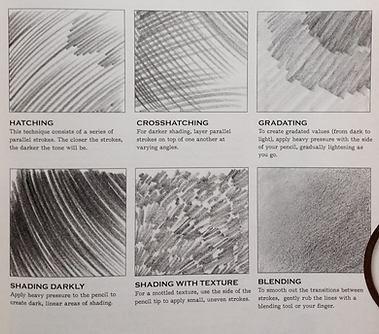
High Contrast Charcoal Drawing
Objective: Use charcoal to render values that create the illusion of form
Your Full Assignment Instructions can be found HERE


SCALED OBJECT
This project is inspired and informed by
"Object", a sculpture by Swiss Surrealist Meret Oppenheim.
Design Brief: Cover a found object in scales made of another material.
Vocabulary: Surrealism, Dada, absurd, uncanny.
Elements of Art: Scale, Shape.
Principles of Design: Pattern, Movement

'Object' by Meret Oppenheim, 1936.
Le Déjeuner en fourrure
Sculpture by Méret Oppenheim
Object, lit. Object, known in English as Breakfast in Fur, is a 1936 sculpture by the surrealist Méret Oppenheim, consisting of a fur-covered teacup, saucer, and spoon.
Task 1. Knowledge & Understanding
Who was Meret Oppenheim?
What does this piece represent?
What is Surrealism?
- Read this article from MoMA
- Listen to the AUDIO about Object: Artist Jenny Holzer and Curator Anne Umland discuss 'Object'.
- In your Process Journal create a page titled 'Scaled Object' and note 10 facts from your research. Make them complete sentences so that you can remember the context later in the assignment.
Note: make sure your research includes answering the 3 questions outlined above.
Task 2. Developing Skills
2 pages of drawing in your Process Journal, using mark-making to illustrate TEXTURE.
Should include a mark-making bank, cross-contour drawing exercises, and value scale in marks.


Readymades Context - how things came to be...
Task 3. Thinking Creatively
Take the readymade object that your teacher provides. Try out different "scale" sizes, and placements. Think of the art elements of PATTERN / REPETITION / SCALE. You are just experimenting here "thinking creatively". We will photograph your experiments and put those in your Process Journal. Don't forget to critique your work as you go, noting what is working and what is challenging.
Task 4. Refinement sketching for the final concept. (Developing Skills criteria)
In your Process Journal, you need to sketch, notate, and PLAN your BIG IDEA.
As you begin, consider how the form of the original object and the new scale material relate to each other visually.
Do they create a different feeling; danger, or humor? Remember our discussions on oxymorons?
As you begin, think hard if the object has a “head” or a “tail.” It is usually best to begin at the “tail” and work forward so that you can easily overlap the new row of scales over the previous one
As you work, consider if you will cover all, or only some, of your object. Consider the size, shape, and density of your scales.
Task 5. Final Outcome (Responding criteria)
-
Cut a decent amount of scales from the material you have chosen
-
Beginning at the “tail” (usually), glue on a row of scales using your hot glue gun
-
Keep gluing scales until the entire object has been covered
For a great grade...
- Project was finished in time for critiques and is “gallery ready”
- Written and visual evidence of practice, experimentation, and revision are apparent
- Strong relationships between Materials, Processes, and Ideas are apparent
- Skills are good to advanced for the student’s grade level, and class level


How to write an artist statement:
Your artist statement is an introduction to your work and should be 100 -150 words. The opening sentence should be distinct and captivating and draw the readers in. Begin with a short paragraph about the basic premise behind your work, artistic style, and vision. What do you want to say with your art? Link it to your inspiration (the Victorian architecture research we did). Use our art language to describe your work (the main elements of art, and principles of design that you focused on).
NB: Look back in your Process Journal to get the language to help write this statement.

House Of Card
Projects Objectives
- to learn a range of cardboard attachment techniques
- to learn about Victorian-era houses and life in this era
- to learn about styles of architecture
- to design and build your own maquette (a sculptor's small preliminary model).
Key Concept: Aesthetics
Related Concepts: Expression & Style
Global Context: Orientation in Space and Time
Statement of Inquiry: There are different rules and principles of beauty in other cultures, which change across time periods.
Inquiry Questions:
Factual: How has architecture changed over time?
Conceptual: To what extent does the identity of a culture, impact the architecture?
Debatable: When is individual taste more important than town planning?
Task 1. Knowledge & Understanding
There are a series of videos and articles below to read and watch.
In your Process Journal...
- Note down 10 Facts about the Victorian Era.
- Imagine you are a teenager in the Victorian Era. Based on your research and readings, write a paragraph describing the events of your day.
- List 5 facts about Victorian architecture.
- Of the styles of Victorian Architecture (Arts & Crafts, Classical, etc.), which is your favorite and why?
- Do you believe in ghosts or spirits? Explain your answer.
Architectural Drawing lessons using One and Two Point Perspective


Task 2. Developing Skills
In your Process Journal, we will practice our drawing/drafting skills.
As an artist/designer it is imperative that we put pen to paper to sketch out our initial ideas.
- Draw a one-point perspective form
- Draw a two-point perspective form
- Render it using the mark-making techniques taught
- Practice sketching more forms, ones inspired by your favorite characteristics of Victorian houses (refer back to your notes from task 1).
In drawing: Shape is 2D - "Form" creates the illusion of 3D


Task 3. Thinking Creatively ~ The Design Process ~
Step 1. In your Process Journal, sketch out the main shapes inspired by your architectural research. You may sketch them as 2D shapes and/or 3D shapes.
Step 2. Focusing on the following elements of art and principles of design... Balance / Shape / Pattern / Movement / Form / & Emphasis
Create a minimum of 4 thumbnail sketches (using your chosen shapes) with a focus on one, or some, of these art elements and principles of design.
N/B: there will be a teacher-lead lesson with exemplars
Step 3. Select your best idea for refinement. Sketch it larger and in more detail. Annotate, to explain concepts that are hard to draw. Add color where needed.


Cardboard Sculptures
Art-making techniques and skills associated with creating 3D sculptures from recycled cardboard.
-
Cardboard Selection: Knowing which types of cardboard are suitable for sculpting based on thickness, strength, and texture.
-
Cutting and Shaping: Techniques for cutting and shaping cardboard pieces using tools such as scissors, utility knives, or box cutters.
-
Scoring and Folding: Scoring the cardboard to create clean folds for intricate shapes and structures.
-
Layering and Stacking: Building up layers of cardboard to create depth and dimension in the sculpture.
-
Joining Techniques: Methods for joining cardboard pieces together such as gluing, stapling, or stitching.
-
Forming Curves and Organic Shapes: Techniques for bending and shaping cardboard to create curves and organic forms.
-
Detailing and Texture: Adding texture and details to the surface of the sculpture using techniques like embossing, carving, or adding additional materials like paper or fabric.
-
Support Structures: Creating internal support structures or armatures to provide stability and strength to the sculpture, especially for larger or more complex designs.
-
Painting and Finishing: Applying paint, varnish, or other finishes to the cardboard sculpture to enhance its appearance and durability.
-
Safety Precautions: Understanding and implementing safety precautions when working with sharp tools and adhesives to prevent injuries.
-
Planning and Designing: Developing a concept or design for the sculpture, including sketching and planning the construction process.
-
Problem-solving: Being able to troubleshoot and problem-solve during the construction process, such as finding alternative solutions if a certain technique doesn't work as expected.
-
Environmental Awareness: Understanding the environmental impact of using recycled materials and incorporating eco-friendly practices into the art-making process.
-
Collaboration: Working collaboratively with others, if applicable, especially for larger projects that may require multiple people to assemble or install.
-
Presentation and Display: Considering how the sculpture will be presented and displayed, including factors such as lighting, mounting, and exhibition space requirements.
Animal Faces
Preparation of materials

Sketching and taking measurements x all your measurements by 10

Structure
Sketching the back-base shape onto cardboard

Cut out your back-base shape
~ including a hole in the top center, so that it can hang on the wall

Measure and draw the side profile, and sketch it out on cardboard x10 initial drawing measurements, cut out.

Join the 2D profile to the center of the 2D base shape.
This is now the 3D base for our sculpture!

Next, let's draw and create the high points of the face; eyebrows, cheekbones. Draw them against your model as shown below...
Trace a feature's shape (use it as a stencil) so that you have double, remember we are trying to make it as symmetrical as possible.

Add cheekbones; use card tabs to help secure shapes

Next, we are going to draw the width of the muzzle (divide it in two, as we will add the two sides separately).

This will be the final initial support structure for a bear. You might want to add additional support structures depending on your animal.

Surface
Now we are going to create the "skin" of the sculpture. Cut LOTS of strips of thinner cardboard. Cut in the direction of the corrugated card. Ply your cardboard before you use it, to ensure that it's smooth, rounded, and workable. Cover the ridges of the base structure first. If you need to trim any parts of the base shape to improve things... do it! Cardboard is very malleable, we can add and subtract until you are happy with the look.

Next, let's build in the forehead and cheeks with strips. The structure will guide you, but you can always look at your model. Don't worry about the details like the eyes, ears, & muzzle yet. When you get to your animal's cheeks... this is the time to choose bigger cheeks or smaller checks, so check your model and decide on shorter strips or longer strips accordingly.
Don't cover the eyes, and nose area. Creating the eyes, nose and ears will happen in the next step "details".

Details
First, we are going to make the eyes: start with a strip that you are going to place between the eyes, to make sure that they are not too close together.
Next, you are going to make a cavity, the eye socket (what's behind the eyeball). Try and make it as big as that space allows.

Eyeballs! We will cut a little square, measure it against the eye socket, and adapt as necessary. When you think you have the correct size, snip it on each edge (in the center) so it can be easily bent and molded into a ball.

Next, we will cut some little strips for the top eyelids. Make sure to ply the card well, so that it will curve nicely.
You can do the same for the undereye, making them slightly thinner strips. You can also add extra card strips in the eyebrow area to give your animal different expressions. Do you want it fierce or cute looking?

To begin the muzzle, first create the strip that will be the tip of the animal's nose. Shape it to suit your animal.

Animals have two separate upper lips. Build these from the bottom center of the nose strip to the side of the muzzle. Then fill in the top lip area with more strips.

"Filled-in" example below...

Next, is the making of the nostrils!
Check your model and observe how wide, long, curved, etc. your animal's nostrils are. You'll need to cut a strip of card to suit, folding it in half-length ways.
To make it curved, you will likely need to make two cuts where you want to curve it, so it folds in those two areas.
Make the bottom end of the strip pointy (cut it on a diagonal).

Once you have the nostril frame, like the example photo below, you need to work around the nostrils with small strips to fill in the nostril holes. On the corners, I find it best to cut a triangle strip so that it fits nicely. You will need to experiment with different-sized strips to get the correct fit.

Filled in nostril holes (below). Next, cut a strip (or two) to go across the top of the nostrils, to combine the nose into one, and synthesize the shape.

Now we are going to work on the top part of the mouth. Start by folding a long strip (the length will depend on how wide you need your animal's mouth). Attach it near the front under part of the nostril. It can be a bit tricky to reach in there and hold it to make it stick, but you will need to ensure it's stuck well for the next part.


EARS - each animals ears will be a slightly different shape, but the way to go about creating its 3D form will be the same.


SYMBOLISM & REPRESENTATION

Artist Role model
shizu saldamando

When This is All Over, 2020, washi paper, wire, ribbon, found chainlink fence. 4x3.5 feet
Task 1. Knowledge & Understanding
Head to this UofM STAMPS (School of Art & Design) site HERE and watch the Video on Saldamando until 10 minutes 30 seconds.
Task 2. Interview one of your grandparents, (if not possible, you may interview a parent or guardian). We want to find out about some artifacts that are important to them. Ask them the following questions & record your answers in your Process Journal.
-
Can you tell me about a meaningful object that has been passed down through your family?
-
What was your favorite toy or item when you were a child?
-
What was your most cherished possession when you were growing up?
-
Did you have any special collections or hobbies when you were younger?
-
Can you describe a special piece of jewelry that holds sentimental value for you?
-
What is the oldest item you still have in your possession, and what is its significance?
-
Do you have any old family photographs or documents that hold a special place in your heart?
-
Can you tell me about a gift that someone gave you that was particularly meaningful?
-
What is an item that you have acquired in your travels that holds special meaning to you?
-
Can you describe a favorite family recipe and the history behind it?
Options could be: excuse yourself to a quiet area and make a phone call. Type them an email and include the questions. Speak to them in person for homework.
Task 3. Developing Skills
In your Process Journal create 2 separate pencil sketches; 1 gray scale, 1 colored pencil.
Draw 2 objects that represent your culture, (you may take "culture" to mean whatever you feel represents you).
Create the drawings in the bottom right of the page, similar to our artist role model's style here...

Notes on La Raza Cosmica, 2008

La Ever, Chica Malcriada 2018
What is Art For?
-
Art Keeps Us Hopeful
-
Art Makes Us Less Lonely
-
Art Rebalances Us
-
Art Helps Us To Appreciate Stuff
-
Art Is Propaganda For What Really Matters
Task 4.
In your Process Journal please write (in full/complete sentences) the answers to these questions…
-
Why does the man in Kasmir walk his cabbage?
-
What kind of art could this be categorized as?
-
Who was the Chinese artist who began this and what was his project symbolizing?
-
After interviewing your grandparent or guardian, list any objects that they mentioned as important.
-
List the objects that you identified and draw as symbolic or representative of you and your “culture”.
-
Out of the 5 “What is Art For?” statements, choose one that resonates the most with you.